
I love making cocktails. I’m nowhere as good at it as any of the mixology gurus you can find on YouTube (one of my favourite ones is this channel), but I love doing it. Once, when the whole pandemic thing is over, I’ll be having the fanciest (read: most drunkenest) cocktail parties again. So taking the step to add a place where I could mix those delicious drinks in style was the most logical thing to do. But how do you build a bar? There’s no right or wrong, but I found the way I did it to be quite easy and it resulted in probably the thing I’m most proud of to date.
Disclaimer: this post contains affiliate links from Amazon. As an affiliate partner, I am eligible for a small commission based on purchases that you made through my links. This is at no added cost to you.
Where to start?
It all begins with an idea, of course. For me, this part of the process can take a long, long, like, mind-numbing long, time. At least, if outsiders were aware of the things going on in my head. But it’s all contained in my gray matter, so people only see the result once it’s done. Nobody will experience the years of planning and re-evaluation of original ideas that I went through in my head.
Anyways! The point came, when the first shy parts of this construct in my head had to become reality. For that, I made some sort of mock-up on the PC. I had an old IKEA 2×2 Kallax cupboard (formerly called Expedit) that I wanted to hack and turn into a bar. There’s a lot of IKEA hacking idea’s out there, like this post on ikeahackers.net (nice website to get lost on btw!) or this video of a dude turning a Kallax cupboard into a small and simple bar. I had some ideas of my own though, so I took a picture of the Kallax thingy I had and made this picture into two little digital sketches of what I thought might look cool:


As you can see, I had two general design ideas, both featured cut out slits in the front board, which I would illuminate from the back. Because I love things that glow and light up. The one on the left featured slanted strips of light and a plain background colour, whereas the other design would utilize a fake brick wall* cover and vertical light. The Kallax cupboard would be the base that I would screw this front unto, and then put a counter top on it, using spacers on top of the cupboard to create more height and some extra room for storage:


Getting some seriously needed help
So there I was, having an idea and some sort of plan. Next step: turning chemistry in my brain into a real world object. I needed help to get started, I’d never undertaken such big a DIY project before. Boy was I naive in thinking that my idea would be the end of it.
So what do you do when you need help doing something, that you’ve never done before? Right, you ask a professional. Luckily it just so happened that my brother is a certified master carpenter. And I’m not even joking with the master part. In Germany you need to go through a program to be allowed to call yourself master of the profession. If you do, though, you’re able to start a business and are even qualified to teach others the practical part of the trade.
Talking to my brother therefore was the first thing I did. And he just whacked all my ideas right out of my head! While I wanted to get it done as cheaply as possible, he was thinking more in terms of “How can you make this as epic as humanly possible, but also be smart about the materials and keep the cost low?”. And man, he was right. It wasn’t the first time that he managed to convince me to not cheap out on something, which just so happens to be the rest of my kitchen. I wanted it cheap, cheap, CHEAP, but he said: man, go ahead and invest those 10 euros for drawers over regular doors, you’ll thank me later. Well. I still got two regular doors instead of drawers for my lower cupboards. Grudgingly exchange one later. And now am super pissed that IKEA discontinued this specific design that my fronts came in, while I still want to replace the last regular door cupboard. It is SO EASY to have a drawer slide out all the way and then being able to access the stuff that would otherwise be hidden away all the way in the back. So now I’ve got to figure something out for that… But I digress!!
IKEA
The BAR! Let’s talk about the bar more. My brother’s idea was simple but genius: go to IKEA (gotta love the store) and get a decent kitchen cupboard that you’d usually put under your kitchen worktop. Those things are literally designed to be what I want them to be and aren’t that expensive. They are also available in a 37cm deep configuration instead of the regular 60 cm. The range of products is called METOD, so you know what to look out for. While I was browsing the IKEA kitchen section, I also saw those small, 20 cm wide apothecary cupboards. I thought: That’s just what I need!! I can attach one to the side of the big frame, and then I’ll have a whole meter of bar. NICE! But the sad thing was, that they only sell those things in 60cm deep versions. So I set out to make one myself. In hindsight, should’ve probably gotten one that’s 60cm deep and “just” cut it shorter. I mean, I have a brother who at that time had the workshop of his employer at hand to do that kind of stuff. But building stuff yourself is so much more satisfying anyway!
To get you an idea of what I got. On the left the apothecary style cupboard that inspired me to make one myself, and on the right the regular, 37cm deep piece with two big drawers to store bottles and other paraphernalia in.


Hardware store
Next stop: the hardware store. I needed wood, and lots of it. Also some paint to get the whole thing the desired colour. And more things, like drawer sliders, wheels to go under the self-made drawer (I had a weird idea, could have been much easier to be honest), a counter top and electrical stuff for wiring it up (as mentioned before, I wanted a backlit front and also some light behind the bar). It was a lot and quite heavy. My dad had to come with my parents’ big VW Touran, because of course I couldn’t fit two 1m by 1.20m sheets of wood into my tiny Peugeot 107 I had at the time.
The last stop was my brother’s work. At the time, he was working at a place with a horrible boss (my brother is his own terrible boss now and even has people to boss around!) that was supplying professional carpenters but also had a shop for regular people. I went there to shop for a counter top, and lo and behold, they had a very nice piece that came back as “rest” from a project they did at a customer’s, and I could have it for a little amount. He even sawed it into the correct sizes for me! Have you figured out already, that I kinda love the dude who happens to be my brother? Yeah. He’s epic.
I loaded everything into my parents’ car, cause my own four wheeler hadn’t grown, despite of a lot of encouragement. And my dad drove me back to my own place in the Netherlands, where I started the week-long process of turning all the raw materials into the finished product…
Getting to work
You’ve got to start somewhere, so I started with putting together the IKEA thing, to get an idea of how I would position everything in the kitchen. When I had that up, I started painting the fronts of the drawers and everything that I thought would make sense to paint dark. I had gotten a dark grey, which I thought looked fancy and would go great with the countertop I chose. Here’s how it looked after some time on the first day:


I’m sorry, but I didn’t take any pictures of how I made the narrow drawer. Somehow it skipped my mind, once I started. It turned out pretty great though, even if I say so myself. Much roomier than the IKEA variant would have been, since I basically didn’t use side regular side boards, just one thin pressed wood board on the side facing the wall, and practically nothing on the side facing the rest of the bar.
The vibrationing
Next up, the outside facing boards… I wasn’t exactly looking forward to it, but I was motivated enough to get started. And that’s basically the trick with everything. Get started. From that point on, it’s so much easier to keep going!
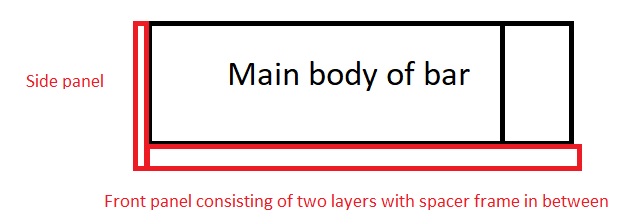
Maybe I should start off with what the idea was generally. I wanted to put the bar flush against the wall to the left on the first picture above and then would make the front with cool lighted slits and on the right hand side another plank to cover the base cupboard and extend upwards, to prevent stuff from falling off the edge. In this top-down drawing, imagine a wall running along the right side of the bar.
The right side panel wasn’t much of a problem, I only had to paint it, since my brother had already cut it to size. The front was another story altogether though. I started by drawing the slits on one of the boards, using a smart system I developed on the fly:


Using an old piece of cardboard, I made a stencil that had different lengths marked on it, and the top part was as wide as I wanted the spaces between the cut-outs to be. So I could draw one, move the stencil along until it aligned with the lower line of the last mark, and then draw the next one. It worked out pretty well!
After that, I drilled holes at both ends of every cut-out, and then took out the rest with a pad saw. But the vibrationing was just beginning at that point… After all the holes were roughly cut, I had to smooth and straighten the edges. And I did that using good old wood rasp files. One round and the other one with a flat as well as slightly curved edge. It was fun! A really good work out. If my lower arms were tingling from the pad saw vibrations before, they were positively humming after two hours of filing and rasping away. My forearms actually felt tingly until more than two hours after I stopped. And it didn’t stop there. After the rasping came the sanding with regular sandpaper. Something like 150 grit I believe. And that was all I did when it came to sanding. At some point I just couldn’t stand the dust any more. The plants on my balcony probably agreed. I gave the front a nice coat of stylish grey paint, and went on to the next issue:


The Electricianing
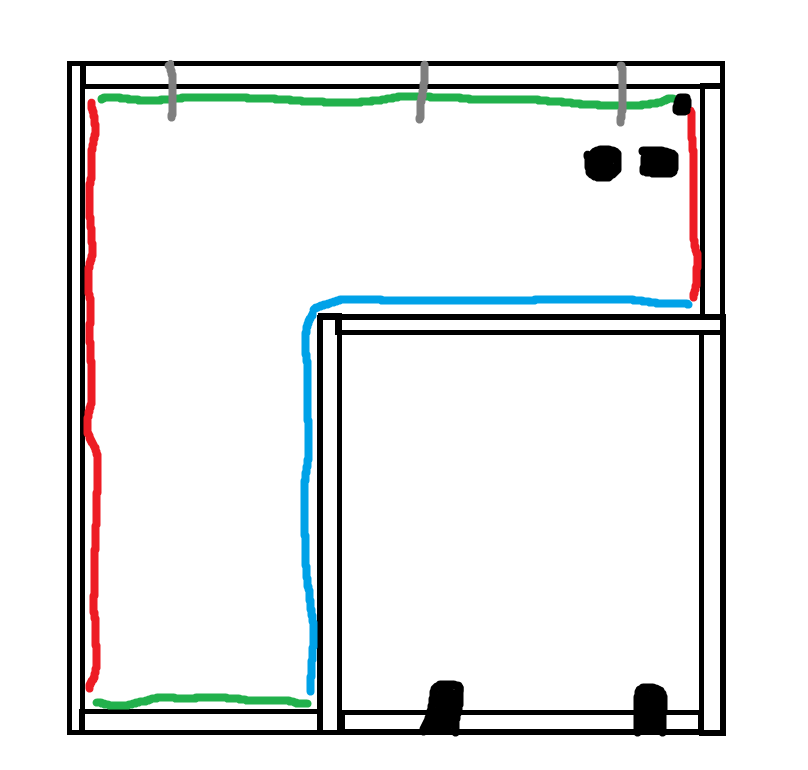
As you can see on one of the pics that isn’t blurry as heck, I had also outlined where the frame would go that was to sit between the actual front and the back board. To put it all together, though, I had to do some preparation with the back board first. I wanted to get a LED strip with RGB colours into the frame, so I could make the front light up in different colours. Also, I wanted to add spot lights in to the working area of the bar, and have a power socket as well as a light switch to control both spots and RGB lighting. When I first started out, I had the idea to use the integrated light switch of the 3 spot combo I got at my favourite Swedish furniture retailer and somehow route the cables so that I could access that light switch from the working area. Same for the RGB LED strip. It came with a infrared sensor and a remote control, so I thought I’d use that to also turn it on and off. And for a power socket, I wanted to attach a power strip with three outlets to the board, using special metal claws that you can screw onto a wall and then pop the power strip in. Looking back, that was a disgusting idea. When I went to the hardware store in my neighbourhood again to get the supplies, I had an epiphany. Since the two front and back panels were separated by a 4-ish centimeter thick frame, I had plenty of room to do cable management AND EVEN GET A REGULAR WALL SOCKET AND SWITCH! You know, the things that go into actual walls. I was ecstatic. I got them in a matching black of course, and went back home to do some electricianing!


I cut out some holes for the socket and switch fittings to go into, and then wired everything up. The third picture shows the area that would be hidden between front and backpanel. On the lower end of the picture, you can see three cables, those are for the spot lights, that would go underneath the overhang of the countertop on the side of the working area. The white box is the transformer for the spots, and the black cables are power cables. I had one cable come in from the bottom of the bar, run up towards the socket and switch. The switch controlled another cable running back down again, where I let it cross the board again, to end up in the cupboard, hidden behind the drawers. That’s where I DID make use of the ugly solution with a power strip and clamps, so I could get power for the LED lighting. I ran the power cable for the LED strip through the board again, into the space between both boards.
Then I put double sided tape across everything, to a) fix cables in place, and b) be able to put aluminium foil on everything. I wanted to get the LED strip to be as bright as possible, so I needed some reflection. Sadly, no pics of the board with foil stuck to it.
Putting everything together
After I also painted the big front boards, it finally was time to put it all together. I put the front plate face down on my kitchen table, and screwed the frame onto it. Then I attached the LED strip to the inside of the frame, like so:
I made sure to keep the infra red receiver of the LED strip close to one of the cut outs in the front panel, so that I could still activate it with the remote control and change colours and effects.
Thanks to careful measuring, I was then able to align the back plate on top of that, and screw it all down, to make one big and bloody heavy piece. Then put it up against the cupboard. I found out that something was REALLY wrong here:


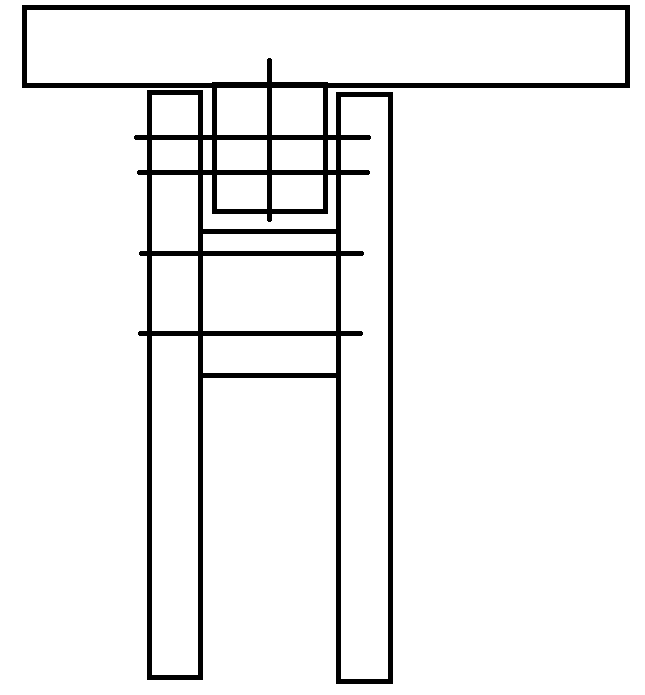
The floor wasn’t level. Like, at all. Sooooooo take the front apart again. Cut off a slanted piece off the bottom with a saw that REALLY wasn’t made for this kind of work. But it worked out, kind of. If you don’t look too closely, it is barely even noticeable! So screw it all back together, and add the counter tops. The above pictures actually show nicely, how I attached the counter that went on top of it all. I made the frame between both boards in such a way, that there was a slot open to the top. I then attached one of the wooden slats I used as a frame to the bottom of the counter top. I could then just slot the counter top into the gap, and screw it in place from the working area:
Simple but elegant, right? I was pretty damn proud of my carpentry and electrician skills. After also attaching the side panel, it actually looked like something fancy!


I just realized, that this was still before I had the glorious idea of using regular fittings for power socket and switch, so don’t see the holes for those yet. And it hadn’t even been painted yet! But you get the idea. I had to wait a bit for my brother anyway, because he hadn’t yet provided the actual counter tops. But I could already try firing up the lighting! I used a battery pack to power the LED strip, because I still hadn’t figured out how to electrify it in the end.
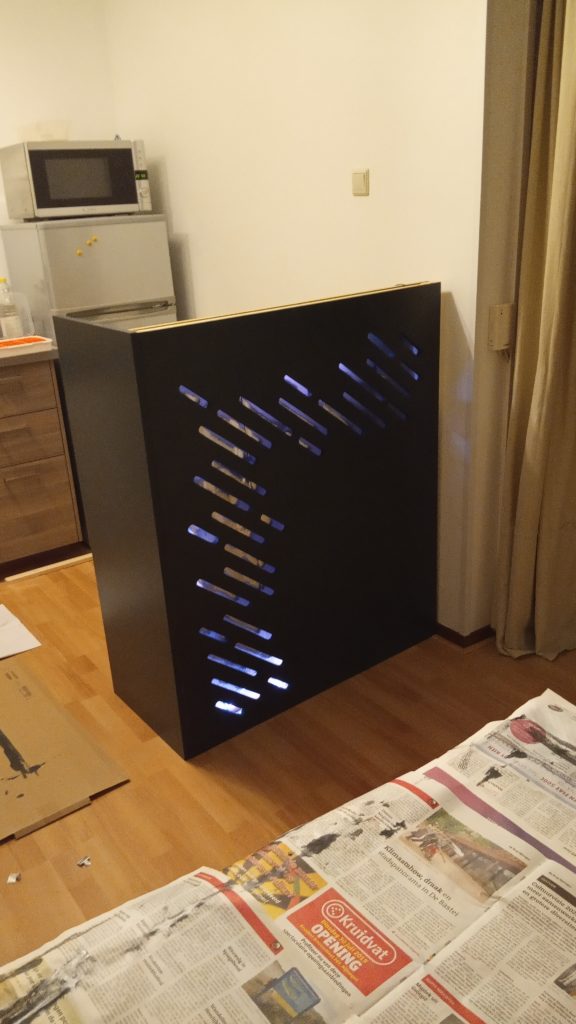
Impressive, innit? I mean, it worked, but my idea of putting some translucent acrylic glass behind the holes to make the light spread evenly seemed very much appropriate after seeing this. Luckily, the hero of my family still had some of that stuff lying around. So when I visited again to pick up the counter tops, I also got some panes of Plexiglas, cut to the correct size. I could finally get the finishing touches done!!!


Wiring everything up was fun, putting the spots under the top was fun, cleaning everything up was fun, realising that I wanted the side panel to be slanted instead of having a 90 degree corner was fun, taking things apart again was fun, sawing the side panel was fun, painting the side panel again was fun, putting everything back together was fun, finally giving it the last cleaning was a LOT of fun, and then it was done. It was time to break it in.
Done!
I filled the drawers with booze and tools to mix the booze with, and then made the first cocktails. And basked in the glory of the lighted front. You have no idea just HOW glorious the feeling was. It was done. Everything fit nicely, it looked REALLY fancy, was functional and just overal epic. And that’s how you build a bar. The total costs were somewhere in the low 500 Euro range I’d say, but man is this thing worth every single cent, drop of sweat, and all the frustrated nerves. And here it is. Bask in it’s radiant beauty. BASK IN IT!!


